Friday, February 10, 2012
Side B
NASA has released a new companion image to the Blue Marble released last week. Check here for the Eastern Hemisphere image and a behind the scenes look at how such images are created.
Thursday, January 26, 2012
Blue Marble 2012
Just 2 days ago, NASA unveiled a new Blue Marble "photo" of the Earth taken on Jan 4, 2012 by the newly launched Suomi NPP satellite.
Satellite photos are not captured in the same way as regular optical or digital cameras. What happens is that light from various bands of wavelength are captured by separate sensors. The data is then selectively composited in a way that would show "true colors" as they would appear to the human eye, e.g. taking the red, green and blue wavelengths and discarding non-visible wavelengths such as infrared. During the compositing stage, color correction can be done to remove the blue tint cause by atmospheric scattering of light to get the vibrant, natural colors like we see in this new NASA image.
To get high resolution imagery, the satellite must have low orbit, which means it will not be able to "see" the entire Earth in one picture frame. Instead, the sensors can only capture a small area of the Earth's surface at a time. As the Suomi NPP is a polar-orbiting satellite, it circles the Earth in a north-south orbit along the longitudinal lines, building up swaths of the Earth's surface as it orbits. Each orbit create a vertical strip of information. A global map can be stitched together when the entire surface of the planet has been covered in this manner.
Anyone who has stitched separate photos into a panorama will know that the process involves fixing perspective distortions and lighting inconsistencies. In any case, the completed map must then be projected onto a sphere to look like the Earth as viewed from a distance. Very few man made spacecraft has travelled this far away to be able to view the planet in its entirety. Even the ISS and space shuttles orbit closely at only 300-500 km above the Earth's surface.
Regardless of the technical manipulations necessarily to achieve the image, it is highly detailed and stunningly beautiful ^^
Thursday, December 29, 2011
Head in the clouds
The traditional way to create clouds for a CG Earth is create a spherical shell slightly larger than the Earth itself, then mapping a cloud texture onto the transparency channel. As you an imagine, this technique works well for long shots in which the whole Earth is visible, but not so good for close ups and oblique camera angles:
As always, adding a little procedural noise to a texture pattern can enhance the detail and quality of an image based texture:
The final step would be to add displacement so that the clouds do not appear like a completely flat layer:
This technique will hold for medium to long shot, but will completely fall apart if the camera gets too close. Here are some more shots to test how far this technique can be pushed:


 |
| Plain clouds texture mapped onto a flat, transparent layer |
 |
| Same flat cloud layer with noise patterns added |
 |
| Add a little displacement into the mix to make things look more natural |
Saturday, December 10, 2011
Glint in your eye
Viewed from space, the Earth generally does not appear very shiny, since most of the natural surfaces have low albedo and reflectance, with the exception of water. The ocean-covered parts of the Earth glint from fairly weakly to very strongly depending on various factors. However, even though 70% of the Earth's surface is covered with water. clouds also cover about 70% of the total land and water area. So the only time specular highlights are visible is when they peer through a cloudless sky, with still water (such as ponds and lakes) acting like polished mirrors giving off the strongest specular sun glints.
To recreate specular highlights on a CG Earth, a specular control map is needed. In addition, some noise should be added to simulate the ocean waves which breaks up the specular highlight into a glossy appearance from far.
The following are work-in-progress shots dated 27 Sept 2011:
To recreate specular highlights on a CG Earth, a specular control map is needed. In addition, some noise should be added to simulate the ocean waves which breaks up the specular highlight into a glossy appearance from far.
The following are work-in-progress shots dated 27 Sept 2011:
 |
| The use of a specular map allows the rivers to glint in the Sun |
 |
| Water is the most intensely specularly reflective material occuring naturally |
 |
| The specular highlights for rivers and lakes are built into the land surface shader using a VEX network. As such, these bodies of water need to be depicted and aligned in the color, specular and displacement maps |
 |
| Turbulent noise nodes are used to build the specularity of the ocean surface shader in a VEX network. A land/water mask is used to inform the shader where the ocean noise is needed |
Saturday, November 26, 2011
Terminator Too
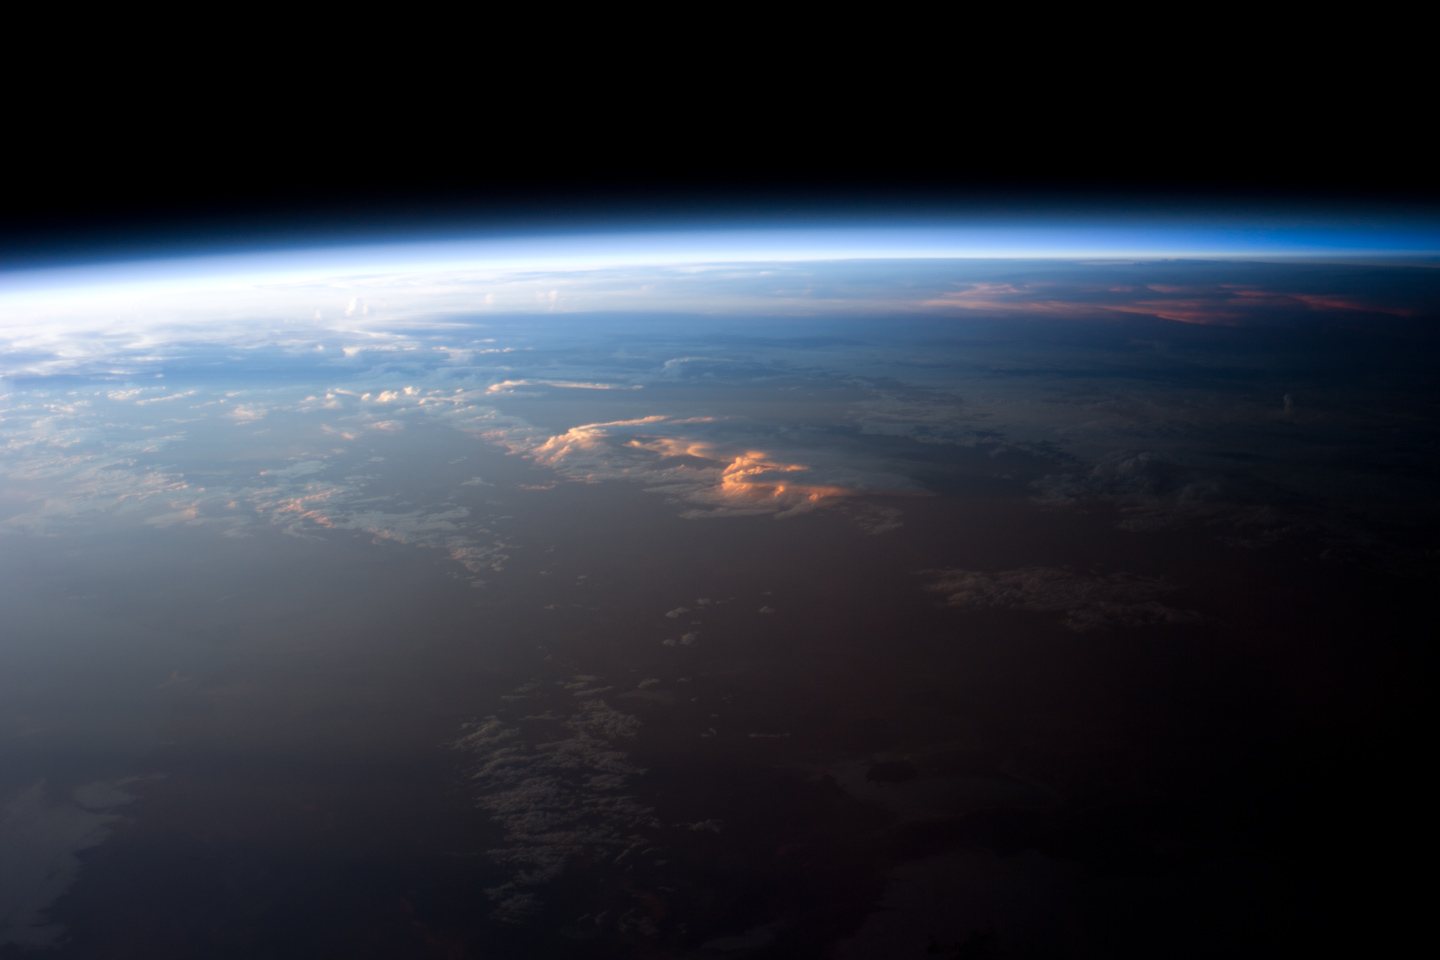
While still on the topic of the Earth's terminator, let's talk about another of its distinct feature - the red color due to atmospheric Rayleigh scattering. From the surface, we experience the reddening as sunrise and sunsets. Here's a reference photo of the Earth's terminator taken from the ISS on 12 Apr 2011:
Clearly a photorealistic CG Earth would need to replicate this feature. The following are test images dated 11-16 Oct 2011:
 |
| Sunset over Western South America (source: NASA) |
 |
| A tell-tale sign that an Earth image is CG - no reddening at the terminator line |
 |
| Sunset colors at the terminator line, but still poorly implemented and highly unconvincing ^^;; |
 |
| A higher resolution, tone-mapped work-in-progress shot of the terminator reddening |
Friday, November 25, 2011
Gamma Terminated

This article from GPU Gems 3 explains gamma correction and the importance of linearity when creating rendered images. Basically, our eyes, cameras and display devices all do not respond to light in a linear fashion. Our eyes are more sensitive in low-light conditions and can see more variations in intensity than in very bright environments. Similarly, the brightness output of a display device does not respond in a linear fashion to the voltage input, being dimmer at the lower intensity ranges than the correct output should be. Because every device has a different gamma response, the same input image may appear very different on different display devices.
Hence, gamma correction has been introduced to ensure that what we see on our typical display (e.g. LCD monitor) looks visually correct compared to what we would see using our naked eye. This blog article from Beautiful Pixels (where the following image originates) offers a good example of what a gamma corrected render should look like:
 |
| From left: uncorrected CG sphere, photo of half Moon, gamma corrected CG sphere |
Viewed from space, the Earth's terminator should also be well defined, as confirmed by photos of the Earth taken from spacecrafts and Apollo astronauts. So then, what's so special about the Earth's terminator?
When light is shone onto a sphere, the terminator line would divide the sphere into exactly two halves - half in the light and the other half in darkness. However, in the case of the Earth, the sunlit portion is actually greater than the night portion. This can be observed as during the equinoxes, there are more than 12 hours of daylight in a 24 hour day. How is that so?
The answer is the Earth's atmosphere. It actually bends light by about half a degree (60km) into the area of the Earth that would otherwise be dark. Also, the atmosphere scatters light across the sky so the ground would not be in total darkness even after the Sun has set.
You can check out which parts of the Earth is currently in day and night here. After looking at the pretty picture, do read the notes for some very good explanations. You can map the picture onto a 3D sphere and confirm for yourself that the terminator line slightly over the halfway mark.
The following is my attempt to capture this effect by modifying the illumination equation in shaders (image dated 7 Oct 2011):

Friday, November 18, 2011
The Known Earth
I had been searching for reference material for what the Earth looks like from deep space, but could not find enough photographic
reference. About a month ago, a friend pointed me at this amazing video called "The Known Universe" developed by the American Museum of Natural History in partnership with the Rubin Museum of Art. It was rendered using Uniview, a real-time astronomical visualization engine that created all the imagery based on scientific data. Do watch this amazing video that shows the extent of our knowledge of the Universe starting from the Himalayas within Earth's atmosphere out to the most distant cosmic microwave background radiation billions of years in the past as recorded by WMAP (the youngest baby pictures we have of our Universe):
Inspired by the video, I adjusted my palette to achieve the following look for my CG Earth. I purposefully chose a camera angle that matched one of the shots in the above AMNH video. If the imagery looks similar, it's because we both used NASA's BMNG data. The clouds are the same configuration, but I was using topography data from January 2004 (still winter in the northern hemisphere) and they are probably using a summer month. However, this is still not the photorealistic look I was going for (image dated 14 Oct 2011):

Recently I came across a huge online collection of Hasselblad photos from the Apollo missions. Even though the color fidelity of the photos are highly inconsistent, I now have access to literally hundreds of reference images of the Earth taken from deep space. I can now spend days balancing the look development to better match reality (assuming the Moon missions and the photos are not hoaxes that is :P)
More to come...
Subscribe to:
Posts (Atom)