Topics

Thursday, December 29, 2011

Head in the clouds

The traditional way to create clouds for a CG Earth is create a spherical shell slightly larger than the Earth itself, then mapping a cloud texture onto the transparency channel. As you an imagine, this technique works well for long shots in which the whole Earth is visible, but not so good for close ups and oblique camera angles:
Plain clouds texture mapped onto a flat, transparent layer
As always, adding a little procedural noise to a texture pattern can enhance the detail and quality of an image based texture:
Same flat cloud layer with noise patterns added
The final step would be to add displacement so that the clouds do not appear like a completely flat layer:

Add a little displacement into the mix to make things look more natural

This technique will hold for medium to long shot, but will completely fall apart if the camera gets too close.  Here are some more shots to test how far this technique can be pushed:


Saturday, December 10, 2011

Glint in your eye

Viewed from space, the Earth generally does not appear very shiny, since most of the natural surfaces have low albedo and reflectance, with the exception of water. The ocean-covered parts of the Earth glint from fairly weakly to very strongly depending on various factors. However, even though 70% of the Earth's surface is covered with water. clouds also cover about 70% of the total land and water area. So the only time specular highlights are visible is when they peer through a cloudless sky, with still water (such as ponds and lakes) acting like polished mirrors giving off the strongest specular sun glints.

To recreate specular highlights on a CG Earth, a specular control map is needed. In addition, some noise should be added to simulate the ocean waves which breaks up the specular highlight into a glossy appearance from far.

The following are work-in-progress shots dated 27 Sept 2011:

The use of a specular map allows the rivers to glint in the Sun
Water is the most intensely specularly reflective material occuring naturally
The specular highlights for rivers and lakes are built into the land surface shader using a VEX network. As such, these bodies of water need to be depicted and aligned in the color, specular and displacement maps
Turbulent noise nodes are used to build the specularity of the ocean surface shader in a VEX network. A land/water mask is used to inform the shader where the ocean noise is needed

Saturday, November 26, 2011

Terminator Too

While still on the topic of the Earth's terminator, let's talk about another of its distinct feature - the red color due to atmospheric Rayleigh scattering. From the surface, we experience the reddening as sunrise and sunsets. Here's a reference photo of the Earth's terminator taken from the ISS on 12 Apr 2011:

Sunset over Western South America (source: NASA)
Clearly a photorealistic CG Earth would need to replicate this feature. The following are test images dated 11-16 Oct 2011:

A tell-tale sign that an Earth image is CG - no reddening at the terminator line

Sunset colors at the terminator line, but still poorly implemented and highly unconvincing ^^;;
A higher resolution, tone-mapped work-in-progress shot of the terminator reddening

Friday, November 25, 2011

Gamma Terminated

Let's talk about terminators and gamma. No, not the human-killing robots from the future, but the line dividing light and shadow on a lit object. And not the gamma radiation that turned a scientist into an angry green giant, but the non-linear behavior of our eyes and optical devices to light intensity. Finally, we'll take a look at how the Earth's terminator is unique from, say, the Moon's terminator.

This article from GPU Gems 3 explains gamma correction and the importance of linearity when creating rendered images. Basically, our eyes, cameras and display devices all do not respond to light in a linear fashion. Our eyes are more sensitive in low-light conditions and can see more variations in intensity than in very bright environments. Similarly, the brightness output of a display device does not respond in a linear fashion to the voltage input, being dimmer at the lower intensity ranges than the correct output should be. Because every device has a different gamma response, the same input image may appear very different on different display devices.

Hence, gamma correction has been introduced to ensure that what we see on our typical display (e.g. LCD monitor) looks visually correct compared to what we would see using our naked eye. This blog article from Beautiful Pixels (where the following image originates) offers a good example of what a gamma corrected render should look like:

From left: uncorrected CG sphere, photo of half Moon, gamma corrected CG sphere
For a solid diffuse surface, the natural appearance would be to have a clearly delineated terminator where the transition from light to dark is well defined.

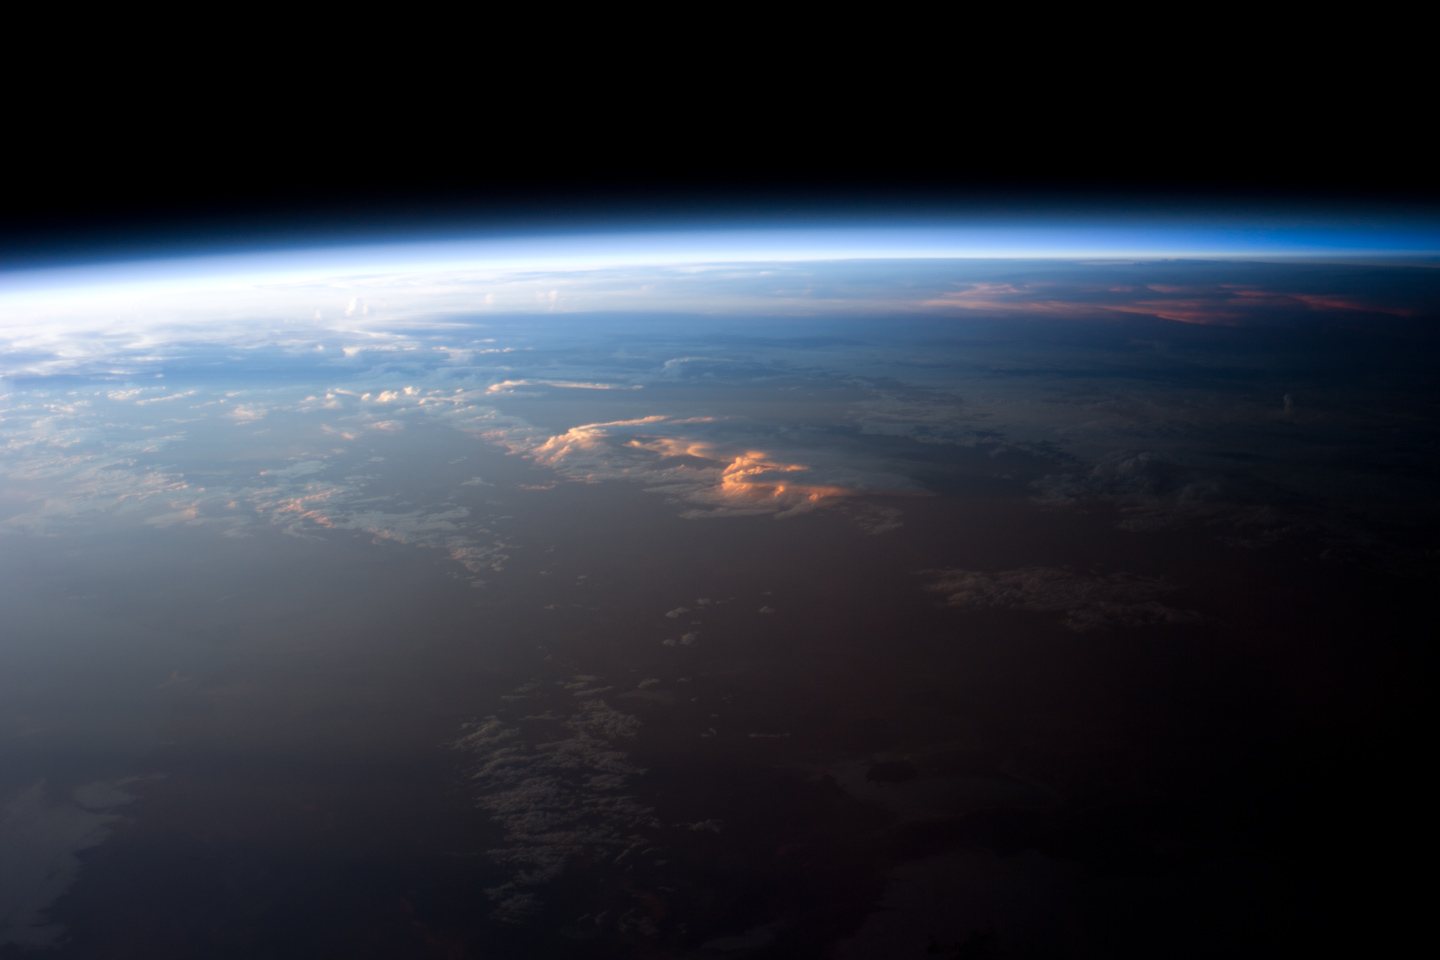
Viewed from space, the Earth's terminator should also be well defined, as confirmed by photos of the Earth taken from spacecrafts and Apollo astronauts. So then, what's so special about the Earth's terminator?

When light is shone onto a sphere, the terminator line would divide the sphere into exactly two halves - half in the light and the other half in darkness. However, in the case of the Earth, the sunlit portion is actually greater than the night portion. This can be observed as during the equinoxes, there are more than 12 hours of daylight in a 24 hour day. How is that so?

The answer is the Earth's atmosphere. It actually bends light by about half a degree (60km) into the area of the Earth that would otherwise be dark. Also, the atmosphere scatters light across the sky so the ground would not be in total darkness even after the Sun has set.

You can check out which parts of the Earth is currently in day and night here. After looking at the pretty picture, do read the notes for some very good explanations. You can map the picture onto a 3D sphere and confirm for yourself that the terminator line slightly over the halfway mark.

The following is my attempt to capture this effect by modifying the illumination equation in shaders (image dated 7 Oct 2011):


Friday, November 18, 2011

The Known Earth

I had been searching for reference material for what the Earth looks like from deep space, but could not find enough photographic reference. About a month ago, a friend pointed me at this amazing video called "The Known Universe" developed by the American Museum of Natural History in partnership with the Rubin Museum of Art. It was rendered using Uniview, a real-time astronomical visualization engine that created all the imagery based on scientific data. Do watch this amazing video that shows the extent of our knowledge of the Universe starting from the Himalayas within Earth's atmosphere out to the most distant cosmic microwave background radiation billions of years in the past as recorded by WMAP (the youngest baby pictures we have of our Universe):


Inspired by the video, I adjusted my palette to achieve the following look for my CG Earth. I purposefully chose a camera angle that matched one of the shots in the above AMNH video. If the imagery looks similar, it's because we both used NASA's BMNG data. The clouds are the same configuration, but I was using topography data from January 2004 (still winter in the northern hemisphere) and they are probably using a summer month. However, this is still not the photorealistic look I was going for (image dated 14 Oct 2011):


Recently I came across a huge online collection of Hasselblad photos from the Apollo missions. Even though the color fidelity of the photos are highly inconsistent, I now have access to literally hundreds of reference images of the Earth taken from deep space. I can now spend days balancing the look development to better match reality (assuming the Moon missions and the photos are not hoaxes that is :P)

More to come...

Views from above (random WIP shots)

These are intermediate work-in-progress images with some light post-processing done (dated 20 Oct 2011, first posted on Facebook): 

Above a Cloudless Sky
Most CG Earth renders have to reduce the amount of clouds or lower the density of the air (or omit the atmosphere altogether) so the Earth can look more recognizable to the average viewer.

Personally I like how the atmospheric scattering gives the Earth a soft translucent feel, though having little reference material to draw upon, I can only imagine how things actually look from further distances than the ISS and Space Shuttles have gone.


Clouds really ruin the look of the sky, especially from space. According to NASA, about 70% of the Earth is covered by clouds on an average day, which means we don't get to see much of the continents and ocean like we are used to seeing on maps and in atlases.

The atmosphere also tints the ground a shade of blue (due to atmospheric scattering) and sometimes occludes it altogether (an effect known as extinction, usually to describe the invisibility of stars from the night sky due to the Earth's atmosphere)

I'm still trying to figure out how to create nice volumetric clouds in CG...

Airglow and City Lights
One of the more interesting things I observe from ISS videos on YouTube was the "airglow" which was clearly visible as a thin yellow-green line at the top edge of the Earth's atmosphere for night exposures.

The colors of the "night side" of my CG Earth was set up to match the look of those videos. Since I'm using a linear workflow, this night shot had to be exposed correctly or else it's just a black image with faint yellow spots. This image was converted to 8-bit JPG from 32-bit EXR render:


A Thin Crust
The Hiimalayas are the tallest mountain ranges on the planet, about 6-8000m above sea level, yet they don't look as jagged from space as we might imagine. Many CG Earth renders has to exaggerate the elevation by an order of at least 3 times to get a decent effect. I kept to relatively realistic values so the mountains don't really stand out.

If the Earth is the size of an apple, the entire Earth's crust would be thinner than the apple skin, which means the highest mountains like Mt. Everest won't even pop out like a pimple ^^;;


Tuesday, November 8, 2011

Atmosphere development

After some research into physically based atmospheric models (Nishita... etc) I realized that while I understand the basic principles behind calculating optical depth, Rayleigh and Mie scattering, I don't have the necessarily Math or shader building skills to recreate them properly and optimally in Houdini. Yet :P

So meanwhile, I'm using an artist's approach. Essentially I'm "pre-computing" the scattering of different wavelengths as well as optical depth due to incident viewing angle and storing them as colors on a color ramp. It's really not as complicated as it may sound, and apparently it's a similar technique used by game programmers to render planetary atmospheres in real time (though I came up with the idea independently before reading about a similar method here).

There are two main components to the scattering:
  1. Rayleigh scattering which scatters blue wavelengths more than red, mostly responsible for blue skies and red sunsets.
  2. Mie scattering which scatters pretty much independently of wavelength, but with a strong bias towards forward scattering making the sky appear brighter around the Sun. This is really only significant if I were rendering a view of the sky from within planet's atmosphere, which I haven't planned on doing just yet :P

The scattering is dependent on the optical depth through which sunlight travels within the atmosphere, and caused by small air molecules in the case of Rayleigh and larger particles and aerosols in the case of Mie. Generally, the more distance that light travels through the air/aerosols, the more the light attenuation and scattering effect. As more blue light gets scattering in all directions, the originally white light from the Sun appears more yellow, then red (during sunrise and sunsets). The actual calculations are further complicated by phase functions which are both light and view dependent, but I've attempted to incorporate those effects into the color ramps also.

Here's how I implemented the atmospheric scattering effects:

Looking at the entire planet from far, the optical depth is minimum at the center of the planet and gets thicker as we move toward the outer edge. This is characterized by less scattering in the middle and more scattering at the circumference, which can be easily approximated using an edge falloff function modulating the opacity of the atmosphere layer.

Terminator redness has been exaggerated for visibility

So far, this only captures the scattering component from points on the Earth's surface through the atmosphere toward the viewer's eye (Earth to Viewer). On top of this, we need to add a light dependent component, which is the scattering along the optical path from the Sun through the atmosphere to the point on the Earth's surface (Sun to Earth). Once again, I used an artist's "hack", employing the standard Lambertian dot product (L.N) and using the resultant to lookup another color ramp. This was used to achieve the "red terminator" characteristic of planets with red sunsets.

The last step would be to achieve the rim falloff from bright sky blue to the blackness of space, and I have chosen to recreate this using a separate layer from the atmosphere (which employs a multi-layered volumetric approach mentioned in this post). This is also achieved using an edge falloff function driving a color ramp:

Color ramps - a CG artist's best friend when it comes to creating shaders without programming
 
In a later post I will explain how I implemented atmospheric density falloff based on altitude - i.e, the air gets thinner the higher up you go.

Tuesday, November 1, 2011

The Bahamas (random WIP shots)

Here are some more random work-in-progress images (dated 10 Oct 2011). 

Facing SE we can see the tip of Florida at the bottom and Cuba (big, long island starting from the bottom right). The chain of smaller islands to the North of Cuba (i.e. to the left in the images) is the Bahamas, popular tourist spot and corporate tax haven (perhaps not these days) :P


Friday, October 28, 2011

Observing the Earth from space

As mentioned in a recent post, the Earth's atmosphere makes everything appear bluish from space. To obtain rich, colorful satellite imagery in which the ground vegetation appears naturally green, color correction must be done to remove the bluish tint. There is a nice tutorial from NASA on how to do that here.

Because I'm using BMNG imagery for my base texture, the source data has already gone through such color correction process by NASA personnel. My work would be to reverse the process by adding an atmosphere on top and therefore re-introducing a bluish tint.

I have a difficult time deciding how much "atmospheric blue" is enough to make the renders look realistic and still naturally colorful. I do have a dial for the amount of atmospheric density, but it seems that there is no single setting that will work with all viewing distances and angles. More research needed in this area... :/

Meanwhile, here's another work-in-progress shot (dated 28 Sept 2011) compared with a still frame from a NASA video filmed from the ISS. The texture is satellite imagery from BMNG January 2004, and we are looking south down at the Rocky Mountains on the North American continent, with the Pacific Ocean to the right:


Thursday, October 27, 2011

Under the sea (random WIP shots)

Apart from the mountains rising up, I also used the Blue Marble's bathymetry data to create the ocean floor using displacement mapping. The sea floor coloring is based purely on guesswork, with cyan for shallows and dark blue for deeper depths. Thankfully once the ocean water goes on top, the sea bed is practically invisible. I kind of like the colorful look though.

(All work-in-progress images below are dated 27 Sept 2011):

Displacement mapped terrain means the mountains will rise up and cast shadows

Displacement mapped seabed using bathymetry data means the ocean floor really sinks below sea level

"Australia, Australia, this is you" ^^ (The sea layer covers up all traces of the ocean floor)

Shallows off the west coast of Central Africa (and an early attempt at specular highlights for the ocean)

Anyway, displacement mapping is cool but it really slows down the rendering a LOT. And I'm using it everywhere ^_^;;


Thursday, October 20, 2011

Behold our mothership

Artists like to depict the Earth as a deep blue planet with richly saturated green or brown continents. From a low orbit, the Earth indeed looks rich and colorful. But from the edge of space onwards, a layer of blue covers the entire planet, desaturated in a manner artists understand as atmospheric perspective.

The air molecules and aerosols in the Earth's atmosphere scatters light of different wavelengths by different amounts. Light with shorter wavelengths (blue end of visible spectrum) gets scattered more than light with longer wavelengths (red), this being the simplified explanation for why the sky is blue.

NASA's Blue Marble 2002. Colorful and beautiful, but not quite what the astronauts saw...?
The most famous photo of the Earth, taken on Dec 7, 1972 by the crew of Apollo 17


Furthermore, most of the ground terrain (especially vegetation) has low albedo which means only a very low percentage of sunlight gets reflected back into space. The oceans would appear black if not for the fact that the water reflects the blue sky. The low albedo of soil and plant life is also the reason why vegetated areas appear very dark from space, and not the bright, beautiful green that we see in the atlas.

Incidentally, the polar ice (being of high albedo) is mostly responsible for reflecting sunlight away from the Earth and reducing global warming by the Sun. But the Arctic ice and Antarctic ice shelves have been melting steadily in recent years, a matter of some concern for environmentalists.

Real photography of the Earth from deep space are few and far between. From them, we can observe that the brightest things visible, along with the blue scattered atmosphere, would be clouds and snow, followed by ice and sand. The "true" colors are not as cheerful as we might like, but we can always take artistic license and put some more hues back into our CG Earth render ^_^


Some of my more presentable rendering attempts (dated 13 Sept 2011, rendered using Houdini) follows:


Naturally, city lights will not appear so bright without either nigh-vision goggles or long exposures, and would be practically impossible in reality, but this kind of "day and night" artistic treatment is always popular ^_^

After rounds of tweaking, I keep coming back to this particular palette, though realistically I should use a deeper shade of blue. For now, this would be the overall look and feel until I come up with something else later...

The air we breathe

One of the earliest goals I set out since the beginning was to have an atmosphere that is not simply a thin shell layer. It's an old trick, but by using multiple layers of closely packed concentric spheres and mapping opacity data onto each layer, a spatial sampling can be achieved which will allow the air to have apparent volumetric density.

Here are some early test shots (dated 3 Sept 2011). Imagine the spikes as mountainous terrain and the dense air forming clouds which gather at lower altitude:

While this technique has its value, it's a case of looking nice from afar, but being far from nice close up


Eventually, I moved on to another alternative method for rendering volumetric clouds, but until this day still have not found a satisfactory solution to create properly nice clouds for this project. More R&D ahead... ^^;;

Sunday, October 16, 2011

Early screenshots of rebooted version

As mentioned before, I started from scratch after a year and the new version is being created using Side Effect's Houdini. I'm using the free Apprentice version at home so the renders are limited in resolution and there is a huge watermark on the bottom right corner:

Shadowed side of clouds and terrain are always too dark

Terminator red zone too wide and unnatural looking

 
Landmasses too dark, sun glint is too broad


Images are dated 30 Aug 2011. Still a long way to go at this juncture...

Tuesday, October 11, 2011

A faltering start...

Armed with some research and basic concepts, I set about creating the actual Earth model. Modeling wasn't an issue at all, since all the layers (land, clouds, atmosphere) were made up of only spheres.Texturing, lighting and rendering proved to be fraught with challenging technical difficulties, some of which were mentioned before in a previous post.

My original approach was to render different layers and passes in Maya and then composite, color correct and add effects in After Effects. From June 2010 to August 2011, I tried this approach (with about half a year of lull in between) and after literally hundreds of attempts, completely failed to get the desired look.

In August 2011, I re-attacked the project with a vengeance, working intensely for long hours after work and during weekends. Ultimately I realized that my initial objectives could not be achieved using this technique alone. While some of the output feels quite nice and artistic to me, none of them look natural or sufficiently realistic :(

Some sample renders:


 It was at this point that I decided to change approach completely...

Saturday, October 8, 2011

Visions of fact or fiction?

The Earth also features in a lot of movies, art and games. In these products the visuals are designed to look believable, or just plain cool. It should be safe to assume that the artists have taken their inspiration and reference from actual satellite imagery. But do they capture what an astronaut actually sees when he or she looks out the window of the Space Shuttle or takes a space walk outside the ISS?

Autobots descend onto Earth in Transformers (2007)
Nuclear missile launch seen from space in Call of Duty: Modern Warefare 2 (2009)
Commander Shepard watches the Earth burn in the Mass Effect 3 debut trailer

So, how should my photorealistic CG Earth look? A good area worth investigating indeed! ^^